A minimalistic prototyping PCB can be made with a 0.1uF soldered onto pin 7 and 9 of a
TSSOP-20 breakout board. The back side of the PCB contains SOIC pads that can be used for the 8 and 16 pins versions of the chip. The chip can operate between 2.7V to 5V with the reset threshold programmable from 2.7V to 4.4V.
 |
| Minimalistic CH32V003 prototyping board |
Core
QingKe V2 series microprocessor is a 32-bit general-purpose MCU microprocessor based on the standard
RISC-V instruction subset RV32E(Base Integer Instruction Set) C(16-bit compression instruction) with only 16 general-purpose registers.
V2 series supports addition to custom XW extensions, Hardware Prologue/Epilogue (HPE), Vector Table Free (VTF), single-wire serial debug interface (SDI), and support for "WFE" instructions.
Chapter 2 Exception
Chapter 3 PFIC and Interrupt Control
Chapter 4 System Timer (SysTick)
Chapter 5 Processor Low-power Settings
Chapter 7 CSR Register List
See reference manual for peripheral programming and application code example. The debug protocol and debug registers are documented in the RISC-V QingKeV2 Microprocessor Debug Manual.
The documentation is a bit minimal and I have to fill in some of the gaps. I use the STM32F103 Reference Manual as a fallback when the peripherals have same register offsets and bit definition as the STM32F103. e.g. I2C
GPIO
While CH32V003F4 pins are backward compatible with STM8F3 (TSSOP-20), 2 additional GPIO pins are available - VCAP pin is replaced as PD0 and NRST as PD7 (selectable via User Option Bytes) .
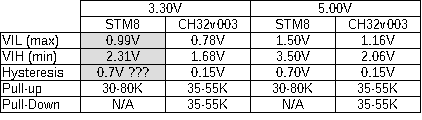
There are some GPIO input threshold differences between the STM8 and CH32V003.
I/O characteristics: STM8 has CMOS input threshold while CH32v003 has LVTTL threshold.
Note: Pull down resistors I normally use for push buttons on shared I/O needs to be below 8.9K as the internal pull-up = 30K (min).
3.3V * 8.9K /(8.9K + 30K) = 0.755V and 5V * 8.9K/(8.9K + 30K) = 1.144V
There are four 5V tolerant pins: PC1, PC2, PC5, PC6 (vs 2 in STM8) and up to 8 ADC pins. The alternate functions are more flexible as some can be mapped to additional GPIO pins. For the 20 pins package, Port C and D are rearranged as two contiguous 8-bit ports which make life easier for interfacing to byte-wise devices.
CH32V003F4P6 (TSSOP-20) GPIO pinout and their alternate functions
Option Byte Register
The following Option Bytes Register are the default setting when code is downloaded from the compiler/Debugger environment Likely these are default factory setting. There doesn't seem to be a way of changing the values from within the IDE.
The Option Byte can be changed by reprogramming the FLASH inside the firmware. "USER and RDPRT are loaded from the user-option bytes area after a system reset".
The WCH-Link Utility can also be used to program the chip and for changing the FLASH Protection, Option Byte setting. "Reading Chip FLASH" doesn't update the GUI setting.
 |
Option Byte Reset default setting from compiler
NRST pinOn the STM8, the NRST pin is also driven by a Open Drain driver (See STM8 Reference Manual Chapter 8 Reset) and asserted during a reset from internal source. I use this pin on the STM8 and similarly on STM32F003 to reset LCD and OLED.
It turns out that this is also the case for the CH32V003 |
 |
| CH32V003 Reset Structure |
PD7/NRST pin is driven low during power up. I have measured 16.27ms from power on to de-assertion of the Reset signal NRST on a single sample. This agrees with the datasheet "Power on reset" parameter.
 |
Trace 0: PD7/NRST without external capacitor Trace 1: Vcc (3.3V) rail |
 |
| 3.3.2 Embedded reset and power control block characteristics. (Table 3-4) |
Bootloader
The chip doesn't have a Boot pin to select Bootloader externally. Instead there is a non-volatile Mode bit that can be set to either jump to user code or bootload upon Reset.
See SystemReset_StartMode(uint32_t Mode) under /EXAM/SRC/Peripheral/src/ch32v00x_flash.c in the
application code example.
PlatformIO forum talks about how to modify the bootloader:
hereDebricking
WCH-Link Utility menu - Full Chip Erase
Resources:
There is a bit-bang USB implementation available in beta - RV003USB This implementation looks much cleaner than the STM8 VUSB project that I have been using. The USB pins are configurable in usb_config.h
There is a CH32V003 F4P6 V-USB Development Board with the USB pins on PA1 and PA2.
I am having a lot of issues with this as it relies on ch32v003fun which pull in its own everything and doesn't play nice with PlatformIO or MounRiver. Even after getting it to compile with no errors, my device isn't recognized. I am hoping someone would remove the dependency.
It is back to STM8 or use a CH32X035 for me.
Alternate IDE:
Visual Studio Code using Platform IO plugin and Community-PIO-CH32V platform.
Upgrade path
The next cheapest upgrade is the CH32X035 or CH32X033 marketed as USB Connectivity parts. They aren't pin compatible, but they can operate at 5V with the improved RISC-V core, FLASH, SRAM, ADC, UART, USB.
RV32I – Base Integer Instruction Set, 32-bit. Currently version 2.1
M – Standard Extension for Integer Multiplication and Division
A – Standard Extension for Atomic Instructions
C – Standard Extension for Compressed Instructions
The most accessible parts are the X033F8P6 and X035F7P6 TSSOP20 parts with cheaply available breakout boards. I have originally ordered the TSSOP and find myself maxing out the GPIO very quickly for a couple of projects I have in mind. I have ordered some QSOP28 but cannot find a cheap source for breakout boards. QSOP has a pin pitch of 0.635mm (0.025") which is slightly tighter than the 0.65mm pitch for TSSOP20 which I can manage with my home made PCB. Their 0.4mm pitched QFN parts on the other hand would require commercial quality PCB.
The USB bootloader is activated by pulling up on the USB D+ pin at power on.