I ran into some problems with a MP2307 Buck converter module recently, so I did some research on my own.
 |
| Vertically mounted modified MH-Mini-360 |
Here is a copy of Mini-360 schematic (.pdf) I found.

It is closed to the 3.3V output schematic in the datasheet with a few component values changed. A variable resistor R1 was added to allow for voltage adjustment.
MP2307 is a synchronous buck converter without a low power mode. The PWM still runs at a fixed frequency with a continuous inductor current about 1A peak to peak - positive and negative inductor current averages to zero. The negative current returns the energy to the power source. A large enough input capacitor could help to recycle the energy.
This is contributing to the high quiescent current that many have observed.
 |
| Datasheet shows Switching waveform at No Load |
Richtek AN033_EN "Buck Converter Selection Criteria" talks about PSM vs PWM at low loads.


I have ran into low frequency switching noise of PSM interfering with my analog circuits in one of my projects.
I used the MP2307 modules in my analog circuits as the PWM even at low load makes it easier to filter the switching noise. See Audio sw - Analog power supply - using as a charge pump for negative rail for analog circuits.
I have modified a module as the constant voltage/constant current charger circuit recently.
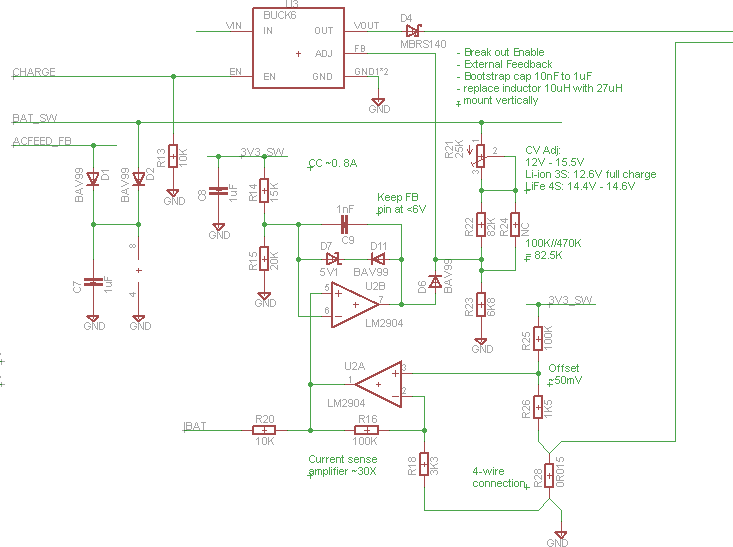
I used D4 to block current leaking from the battery during soft-start and when the input supply is disconnected. An external feedback voltage divider is connected to the battery after D4 to compensate for the diode drop.
Battery charging current is monitored by R28. A small DC offset of ~50mV is added so that current flowing in and out of the battery can be monitored. The charge current is controlled by the current feedback loop at U2B. As the DC offset could be switched off for power management outside of charging making U2B output positive. D7 and D11 is used to clamp the output below the 6V limit of the MP2307. D7 value was empirically determined as it is different than what LTSpice predicts - inaccuracy in my zener diode model.
Everything works exactly as I designed except for the Mini-360 module was overheating. At a first glance, the MP2307 internal switch should be good enough.

Both the inductor and the MP2307 gets very hot. The overall efficiency was around 70%. Could it be fake chips, fake inductor or something else?
It turns out, the inductor value is too low for the high duty cycle in my application. For each switching cycle, the 10uH inductor have longer time to reach much higher current. Both inductor and internal switch have to operate at a higher currents and cause more conduction losses.
Here is what can happen (C) when an inductor goes into saturation. The inductor current increase more rapidly and this causes even more conduction losses at the internal switches and inductor.
A higher inductance would have a slower rise in current.
 |
| Current vs Time plot as an inductor goes into saturation Source: http://elm-chan.org/works/lchk/report.html |
The datasheet even has an equation for the needed value:

L = 15V / (340kHz * (0.3 * 1A)) * (1 - 15V/18V) = 24.5uH, picking the next value up as 27uH.
I only have CD75-100M inductor (10uH). I took off the wires and counted the turns 16T.
The core can only handle so much flux before it goes into saturation. That flux is proportional to N*I
2.3A * 16/27 = 1.36A which agrees with the 27uH part rating which means that it is made using the same core with more windings.

Inductor rating is ~ 1.3 * I, so 1.3A is fine.

Since L is proportional to N^2, the required turns = 16T * sqrt(27/10) = 27T. I used AWG 29 wires I got from old transformer.
The core can only handle so much flux before it goes into saturation. That flux is proportional to N*I
2.3A * 16/27 = 1.36A which agrees with the 27uH part rating which means that it is made using the same core with more windings.
The overall efficiency went up to the 90% range after the inductor change..
At 90% efficiency, 15V*0.8A * (100% - 90%) = 1.2W for the module to dissipate.
I might charge current 0.8A (due to previous overheating) back to 1A after some more testing.
I mounted the module vertically so that its back side ground fill is also exposed. This increases the surface area for natural convection and help with the heat dissipation.
Here are the modifications I have made.
